VCP7-CMA – Objective 1.2
Disclaimer: These are my notes from taking the 2V0-731 exam. If something doesn’t make sense, please feel free to reach out.
The goal of this objective is to understand the XaaS functionality within vRA
Objective 1.2 – Create and Manage XaaS Blueprints with Custom Resource Mappings
- Create and manage XaaS resources in vRealize Automation based on the design
- Configure Active Directory plugin
- Configure REST plugin
- Configure PowerShell plugin
- Configure SOAP plugin
- Configure vCenter Server plugin
- Create and manage custom resources
- Create and manage XaaS Service Blueprints
- Create a service blueprint form
- Configure output parameters
- Publish the blueprint
- Create and manage XaaS resource actions
- Create a service blueprint form
- Configure output parameters
- Publish the blueprint
- Create and manage resource mappings with specific conditions
References
XaaS is a means of presenting vRO workflows through vRA.
When adding endpoints it’s important to use the vRA interface rather than vRO.
Administration – vRO Configuration – Endpoints – Add
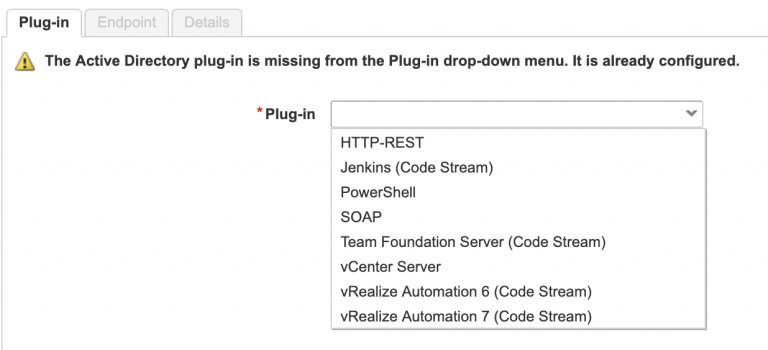
You can only have one AD plugin configured, once the first one is added it disappears from the list and a message is displayed on the Type selection page.

Default timeouts for REST plugin are:
- Connection – 30s
- Operation – 60s
A Custom Resource is a definition of an object that is linked to an existing vRO object type, E.g. AD:User.
Once created you can create a blueprint to provision the object, ensuring the output is set to the custom resource.
Once vRO has provisioned the resource & vRA knows what resource it is. Resource actions can be run against those objects. E.g.
- Disable user
- Enable user
- Destroy user
When creating workflows, set it to be available if certain conditions are met. So only allow disable if the user is enabled etc.
When destroying a provisioned resource, ensure the Disposal check box is ticked, otherwise can end up with orphaned items.
First thing to do when creating XaaS Blueprints is to select the vRO workflow that you’ll be running. Make a note of the Input/Output values for later.
On the General tab, give the Blueprint a sensible name & description. On the form, the bare minimum you need are the Input values from earlier, as without these the workflow will fail. Add anything else you need/want to the form and click next. Once you’re on the Provisioned Resource tab, select a defined Custom Resource as the output r choose No Provisioning.
A defined Custom Resource will give you the ability to perform Resource Actions on the provisioned object. No Provisioning will mean that you don’t have the ability to manage the object through vRA.
To create a Resource Action, you need to have created the Custom Resource first.